TM-9-2320-361-20 - Page 475 of 1207
TM 9-2320-361-20
4-42. BLACKOUT DRIVE LAMP AND HOUSING REPLACEMENT
This task covers:
a. Blackout Drive Lamp Removal
c. Blackout Drive Lamp Housing Installation
b. Blackout Drive Lamp Housing Removal
d. Blackout Drive Lamp Installation
INITIAL SETUP:
APPLICABLE MODELS
REFERENCES (TM)
All
TM 9-2320-361-10
MATERIALS/PARTS
TM 9-2320-361-20P
Nine lockwashers
EQUIPMENT CONDITION
Three O-rings
Parking brake set (TM 9-2320-361-10).
Gasket
Hood raised and secured (TM 9-2320-361-10).
Battery ground cable disconnected (para. 4-48).
a. Blackout Drive Lamp Removal
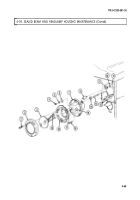
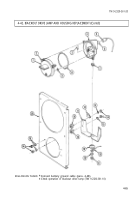
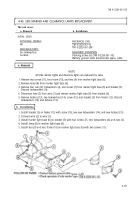
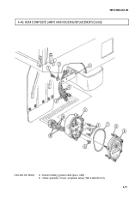
1. Loosen three screws (2) and remove lens cover (1), three O-rings (9), and gasket (8) from blackout
drive lamp housing (4). Discard O-rings (9) and gasket (8).
2. Remove lamp (3) from blackout drive lamp housing (4).
b. Blackout Drive Lamp Housing Removal
NOTE
Tag all wires for installation.
1. Remove wire (5) from connector plug (6).
2. Remove nut (17), lockwasher (18), ground wire (16), mounting washers (19) and (7), and blackout
drive lamp housing (4) from bracket (11). Discard lockwasher (18).
3. Remove eight nuts (14), seven lockwashers (15), lockwasher (13), clamp (12), bracket (11), and four
shock mounts (10) from plate (20). Discard lockwashers (15) and (13).
c. Blackout Drive Lamp Housing Installation
1. Install four shock mounts (10) and bracket (11) on plate (20) with seven new lockwashers (15),
clamp (12), new lockwasher (13), and eight nuts (14).
2. Install blackout drive lamp housing (4), mounting washers (19) and (7), ground wire (16), new
lockwasher (18), and nut (17) to bracket (11).
3. Connect wire (5) to connector plug (6).
d. Blackout Drive Lamp Installation
1. Install lamp (3) in blackout drive lamp housing (4).
2. Install new gasket (8), three new O-rings (9), and lens cover (1) on blackout drive lamp housing (4)
with three screws (2).
4-64
Back to Top

