TM-9-2330-202-13-P - Page 174 of 552
LAMP/LED REMOVAL - Continued
NOTE
•
If lamps are present, perform Step 4.
•
If LEDs are present, perform Steps 5 and 6.
4.
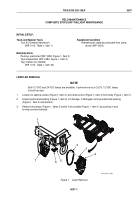
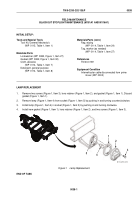
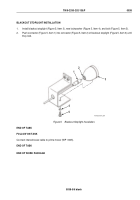
Remove two lamps (Figure 2, Item 8) from sockets (Figure 2, Item 9) by pushing in and
turning counterclockwise.
5.
Insert screwdriver into slot inside center hole in LED (Figure 2, Item 8). Push in firmly, turn counterclockwise,
and remove LED (Figure 2, Item 8) from socket (Figure 2, Item 10).
6.
Insert screwdriver into slot on left side of LED (Figure 2, Item 9) and open LED cover, allowing access to inside
slot in center hole. Push in firmly in center hole slot, turn counterclockwise slightly, and remove LED
(Figure 2, Item 9) from socket (Figure 2, Item 10).
END OF TASK
LAMP/LED INSTALLATION
NOTE
•
LEDs can be used to replace lamps that were removed.
•
To install LEDs, perform Step 1.
•
To install lamps, perform Step 2.
1.
Install two LEDs (Figure 2, Items 8 and 9) in sockets (Figure 2, Item 10) by snapping into place by hand.
2.
Install two lamps (Figure 2, Item 7) in sockets (Figure 2, Item 10) by pushing in and turning clockwise.
3.
Install two lamps (Figure 2, Items 5 and 6) in sockets (Figure 2, Item 1) by pushing in and turning clockwise.
4.
If removed, install new preformed packing (Figure 2, Item 2) in lens (Figure 2, Item 4).
5.
Install lens (Figure 2, Item 4) on body (Figure 2, Item 11) and tighten six captive screws (Figure 2, Item 3).
1
2
3
4
5
6
7
7
8
9
10
11
M116_M101_050
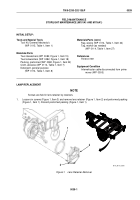
Figure 2.
Lamp/LED Replacement.
END OF TASK
TM 9-2330-202-13&P
0037
0037-2
Back to Top


