TM-9-2330-342-23-P - Page 854 of 1348
REMOVAL - Continued
4.
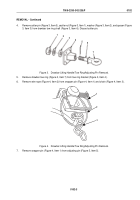
Install rear roller assembly (Figure 1, Item 5) in vise.
5.
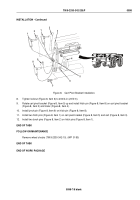
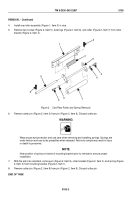
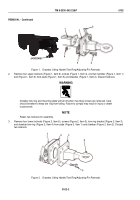
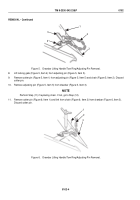
Remove two screws (Figure 2, Item 5), bushings (Figure 2, Item 6), and roller (Figure 2, Item 7) from roller
bracket (Figure 2, Item 4).
8
9
1
2
3
4
5
6
7
6
5
Figure 2.
Cart Rear Roller and Spring Removal.
6.
Remove cotter pin (Figure 2, Item 2) from pin (Figure 2, Item 9). Discard cotter pin.
WARNING
Wear proper eye protection and use care when removing and installing springs. Springs are
under tension and can act as projectiles when released. Failure to comply may result in injury
or death to personnel.
NOTE
Note position of spring on indent of mounting bracket prior to removal to ensure proper
installation.
7.
With the aid of an assistant, remove pin (Figure 2, Item 9), roller bracket (Figure 2, Item 4), and spring (Figure
2, Item 3) from mounting bracket (Figure 2, Item 1).
8.
Remove cotter pin (Figure 2, Item 8) from pin (Figure 2, Item 9). Discard cotter pin.
END OF TASK
TM 9-2330-342-23&P
0100
0100-2
Back to Top

