TM-9-2350-256-10 - Page 280 of 796
ROD INSERTION - Continued
WARNING
Always wear welding gloves when inserting rods into or removing rods from the exothermic
cutter. Failure to comply may result in personnel injury.
NOTE
Check to see that the collet in the torch is the appropriate size to properly fit the rod being
used. If collet needs to be replaced, perform Steps 1 through 3.
1.
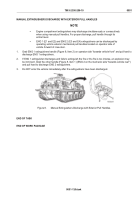
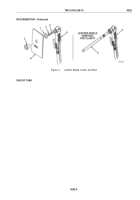
Remove collet nut (Figure 4, Item 7), collet (Figure 4, Item 2), and collet washers (Figure 4, Items 1 and 3)
from torch (Figure 4, Item 4).
2.
Select a desired collet (Figure 4, Item 2) to properly fit rod being used.
3.
Install collet (Figure 4, Item 2) and collet washers (Figure 4, Items 1 and 3) on torch (Figure 4, Item 4).
4.
Slide leather shield (Figure 4, Item 6), smooth finished side facing away from torch (Figure 4, Item 4), onto
collet nut (Figure 4, Item 7).
5.
Install collet nut (Figure 4, Item 7) with leather shield (Figure 4, Item 6) on torch (Figure 4, Item 4). Tighten
collet nut.
6.
Loosen collet nut (Figure 4, Item 7) one-half turn.
7.
Insert recessed end of rod (Figure 4, Item 5) through collet nut (Figure 4, Item 7) until seated securely at
bottom of collet (Figure 4, Item 2).
8.
Tighten collet nut (Figure 4, Item 7) to lock rod (Figure 4, Item 5) in place.
9.
Check for oxygen leaks at collet nut (Figure 4, Item 7). If a leak exists:
a.
Ensure rod (Figure 4, Item 5) is firmly seated.
b.
Inspect rod (Figure 4, Item 5) for damage.
c.
Remove collet washers (Figure 4, Items 1 and 3) and inspect for damage. Replace if necessary.
TM 9-2350-256-10
0052
0052-8
Back to Top

