TM-9-2350-256-10 - Page 284 of 796
PIERCING
WARNING
Always wear adequate protective clothing and a full face shield, and use the leather shield
during piercing operations. Blowback is greater when piercing. Failure to comply may result
in personnel injury and/or damage to equipment.
NOTE
•
Set the oxygen regulator to 35 psi when starting piercing operations to avoid
blowback. When the penetration is approximately 4 in. (10.16 cm) deep, increase
the oxygen pressure to 50 psi.
•
To pierce a pin with a 0.75-in. (1.905-cm) diameter or smaller, weld a small piece
of angle iron onto the head of the pin at the 3 o'clock and 9 o'clock positions to
establish a trough guide. This helps to assure the production of a straighter hole.
After penetrating 3 to 4 in. (7.62 to 10.16 cm), you can remove the angle guide and
complete the hole.
•
When piercing a pin longer than 7 in. (17.78 cm), it is best to use a 0.375-in.
(0.9525-cm) diameter rod.
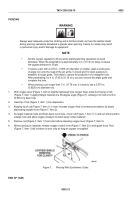
1.
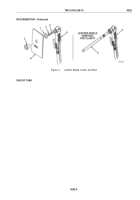
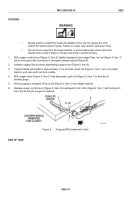
With oxygen lever (Figure 7, Item 2) slightly depressed (low oxygen flow), press burning tip of rod
(Figure 7, Item 1) against target material at a 90-degree angle (Figure 7), allowing it to melt a 0.25-in.
(0.635-cm) deep hole.
2.
Insert tip of rod (Figure 7, Item 1) into depression.
3.
Keeping tip of rod (Figure 7, Item 1) in hole, increase oxygen flow to increase penetration by slowly
depressing oxygen lever (Figure 7, Item 2).
4.
As target material melts and flows back out of hole, move rod (Figure 7, Item 1) in and out and around to
enlarge hole and allow oxygen pressure to wash away molten material.
5.
Remove rod (Figure 7, Item 1) from hole before releasing oxygen lever (Figure 7, Item 2).
6.
When piercing is complete, release oxygen control lever (Figure 7, Item 2) to extinguish torch. Rod
(Figure 7, Item 1) will continue to burn only as long as oxygen is supplied.
Figure 7.
Piercing With Exothermic Cutter.
END OF TASK
TM 9-2350-256-10
0052
0052-12
Back to Top

