TM-9-2350-311-34-2 - Page 294 of 552
TM 9-2350-311-34-2
6-7
ACCUMULATOR ASSEMBLY (MAIN) - CONTINUED
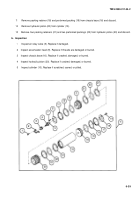
c. Inspection
1
Inspect two externally threaded rings (26). Replace if threads are damaged.
2
Inspect valve cap (23). Replace if damaged.
3
Test valve core (25). Replace if it leaks.
4
Inspect valve body (24). Replace if damaged.
5
Inspect dust protective caps (28 and 31). Replace if damaged.
6
Inspect cylinder (27). Replace main accumulator assembly (3) if cracked, inside is scored, or inside diameter
is greater than 6.547 inches (16.63 cm).
7
Inspect accumulator piston (35). Replace if cracked or scored. Measure fit of accumulator piston in cylinder
(27) and replace if greater than 0.012 inch (0.3 mm).
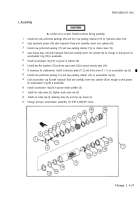
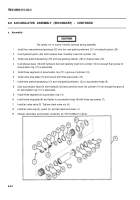
d. Assembly
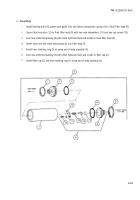
1
Coat accumulator piston and inside of cylinder with clean hydraulic fluid before assembly.
Install new seal assembly (37), and two new ring guides (36) on accumulator piston (35).
NOTE
2
3
Be careful not to scratch finished surface of accumulator piston.
Insert accumulator piston (35) into cylinder (27).
Install new preformed packing (34), valve body (24), valve core (25), and valve cap (23) on top dust protec-
tive cap (31).
4
Install new packing retainer (33) and new preformed packing (32) on top dust protective cap (31).
5
If necessary for replacement, install instructional plate (31.2) and four screws (31.1) on protective cap (31).
6
Install top dust protective cap (31) on cylinder (27).
7
Install new packing retainer (30) and new preformed packing (29) on bottom dust protective cap (28).
8
Install bottom dust protective cap (28) on cylinder (27).
9
Install two externally threaded rings (26), one at each end of cylinder (27).
10
Charge main accumulator assembly (3) (TM 9-2350-311-20-2).
NOTE
6-32 Change 2
Back to Top

