TM-9-2520-234-35 - Page 174 of 323
CHAP
5,
SEC
X X
BRAKE ANCHOR RING, CLUTCH REACTION PLATE REBUILD
PAR
162-165
Section XX. LEFT- AND RIGHT-BRAKE ANCHOR RING AND CLUTCH
REACTION PLATE ASSEMBLIES—REBUILD
162. DESCRIPTIO N
Refer to pars. 16 and 17 for the descrip-
tion of the left- and right-brake anchor ring
and clutch reaction plate assemblies.
163. DISASSEMBLY (figs. 377 and 381,
fold-outs 6 and 10)
a . Left- and Right-brake Anchor Ring
Assemblie s
Note . The left- and right-brak e
anchor ring assemblies are identical,
therefore, the following disassembly
procedures apply to either assembly.
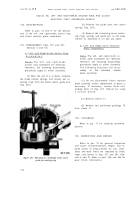
(1) With the aid of a C-clamp, compress
the brake release springs, and remove two re-
taining rings from the brake return guide pins
(fig. 207).
Figure 207. Removing (or installing) brake return
guide pin retaining ring
(2) Remove the guide pins and return
springs (fig. 207).
(3) Remove the remaining seven retain-
ing rings, springs and guide pin, in the same
manner as described in (1) and (2), above.
b . Left- and Right-clutch Reaction
Plate Assemblie s
Note . The left- and right-clutch re-
action plate assemblies are identical,
therefore, the following disassembly
procedures apply to either assembly.
The following describes the disas -
sembly
of
the
left-clutch
reaction
plate assembly.
(1) Do not disassemble clutch reaction
plate assembly unless replacement of parts is
necessary. If necessary, remove three self-
locking bolts 72 (fig. 377, fold-out 6), using
a l/2-inch wrench.
(2) Remove sleeve 71.
(3) Remove two preformed packings 70
from sleeve 71.
164. CLEANIN G
Refer to par. 71 for cleaning recommen-
dations.
165. INSPECTION AND REPAIR
Refer to par. 72 for general inspection
and repair recommendations. Repair and re-
build points of measurement for fits, clear-
ances and wear limits are indicated by small,
lower case letters in figs. 377 and 381, fold-
outs 6 and 10. Refer to pars. 240 and 244 for
wear limits information.
14 2
Back to Top


