TM-9-2520-272-40 - Page 274 of 620
TM 9-2520-272-40
0034
ASSEMBLE LEFT COVER ASSEMBLY
NOTE
Do Step 1 through Step 4 if any of inserts were removed.
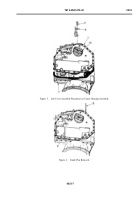
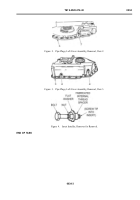
1. Assemble 3/8-16 x 3 inch bolt and 3/8-16 nut into Insert Installer (Figure 6).
2. Screw one insert (Figure 5, Item 2) onto bolt. Screw nut against insert.
3. Install insert (Figure 5, Item 2) in left cover assembly (Figure 5, Item 3) to 0.005 to 0.062 in. (0.127 to 0.157
mm) below surface of left cover assembly (Figure 5, Item 3).
4. Repeat Step 2 and Step 3 to install two other inserts (Figure 5, Item 2) if removed.
5. Install new O-ring (Figure 5, Item 6) on pipe plug (Figure 5, Item 5).
NOTE
Sealant is not applied to pipe plug that has an O-ring.
6. Apply petrolatum to O-ring (Figure 5, Item 6).
7. Install plug (Figure 5, Item 5) in left cover assembly (Figure 5, Item 3).
8
. Torquep
lug(F
igure5
,I
tem5)to72to96lb-
in
.(8to11N·m)
.
NOTE
Some pipe plugs are precoated and do not require thread-locking lubricating sealant.
9. Apply sealant to threads of six pipe plugs (Figure 5, Item 1) and Figure 8, Item 7) and (Figure 5, Item 4).
10.Install four pipe plugs (Figure 7, Item 4) in left cover assembly (Figure 7, Item 3).
11
.Torquep
lugs(F
igure7
,I
tem4)to96to120lb-
in
.(11to14N·m)
.
12.Install pipe plug (Figure 8, Item 7) in end of left cover assembly (Figure 8, Item 3).
13
.Torquep
lug(F
igure8
,I
tem7)to50to60lb-
in
.(6to7N·m)
.
14.Install pipe plug (Figure 5, Item 1) in end of left cover assembly (Figure 5, Item 3).
15
.Torquep
lug(F
igure5
,I
tem1)to21to28lb-
f
t(28to38N·m)
.
Back to Top


