TM-9-2815-205-24 - Page 289 of 856
REMOVAL - Continued
7.
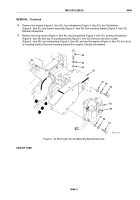
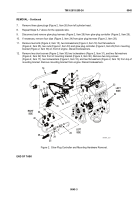
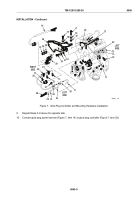
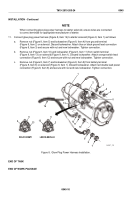
Remove three glow plugs (Figure 2, Item 26) from left cylinder head.
8.
Repeat Steps 5–7 above for the opposite side.
9.
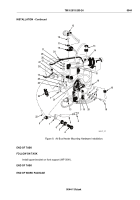
Disconnect and remove glow plug harness (Figure 2, Item 28) from glow plug controller (Figure 2, Item 29).
10.
If necessary, remove four clips (Figure 2, Item 24) from glow plug harness (Figure 2, Item 28).
11.
Remove two bolts (Figure 2, Item 15), two lockwashers (Figure 2, Item 16) four flat washers
(Figure 2, Item 35), two nuts (Figure 2, Item 33) and glow plug controller (Figure 2, Item 29) from mounting
bracket (Figure 2, Item 36) on front of engine. Discard lockwashers.
12.
Remove two short screws (Figure 2, Item 30) two lockwashers (Figure 2, Item 31), and two flat washers
(Figure 2, Item 32) from front of mounting bracket (Figure 2, Item 36). Remove two long screws
(Figure 2, Item 17), two lockwashers (Figure 2, Item 18), and two flat washers (Figure 2, Item 19) from top of
mounting bracket. Remove mounting bracket from engine. Discard lockwashers.
LEFT
SIDE
LEFT
SIDE
RIGHT
SIDE
15
16
17
18
19
22
23
24
24
24
24
25
26
27
28
29
33
34
35
36
14
30
31
32
MAINT_129
Figure 2.
Glow Plug Controller and Mounting Hardware Removal.
END OF TASK
TM 9-2815-205-24
0045
0045-3
Back to Top

