TM-9-2815-225-34-P - Page 242 of 736
TM 9-2815-225-34&P
0024 00
0024 00-2
AIR AFTERCOOLER (Contd)
TM 9-2815-225-34&P
0024 00
DISASSEMBLY
NOTE
This procedure covers air aftercooler repair for Big Cam I
and Big Cam III engines. Big Cam III water outlet may be
equipped with lockwashers. Discard lockwashers if equipped.
1.
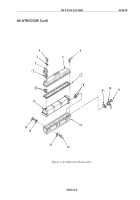
Remove three screws (4), washers (3), water outlet (2), and gasket (1) from air aftercooler
cover (5). Discard gasket (1).
2.
Remove two screws (11), water inlet (10), and gasket (9) from intake manifold (12). Discard
gasket (9).
3.
Remove twenty-four screws (6), air aftercooler cover (5), and gasket (7) from intake manifold (12).
Discard gasket (7).
4.
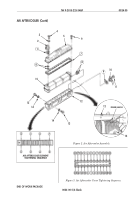
Remove eight screws (13), washers (14), and air aftercooler element (15) from intake
manifold (12).
5.
Remove four O-rings (8) from air aftercooler element (15). Discard O-rings (8).
CLEANING AND INSPECTION
1.
For general parts cleaning information, refer to CLEANING, WP 0051 00.
2.
For general parts inspection information, refer to INSPECTION, WP 0051 00.
NOTE
Replace any part that does not pass visual inspection or is
outside specified wear limits.
3.
Inspect water outlet (2), water inlet (10), air aftercooler cover (5), and intake manifold (12) for
cracks, corrosion, and stripped or elongated threaded holes. Repair any damaged threaded holes.
4.
Inspect air aftercooler element (15) for cracks, corrosion, and stripped or elongated threaded
holes. Repair any damaged threaded holes.
5.
Inspect air aftercooler element (15) for leaks, as follows:
a. Cap one end of air aftercooler element (15) airtight.
b. Connect a suitable air pressure tester to other end of air aftercooler element (15).
c. Immerse air aftercooler element (15) in tank of water, pressurize air aftercooler element (15) to
20 psi (138 kPA) for 2 minutes, and look for bubbles.
d. If a leak is detected, replace air aftercooler element (15).
Back to Top

