TM-9-2815-225-34-P - Page 264 of 736
TM 9-2815-225-34&P
0027 00
0027 00-4
TURBOCHARGER HT-3B (Contd)
CLEANING AND INSPECTION
1.
For general parts cleaning information, refer to CLEANING, WP 0051 00.
2.
For general parts inspection information, refer to INSPECTION, WP 0051 00.
NOTE
Replace any part that does not pass visual inspection or is
outside specified wear limits.
3.
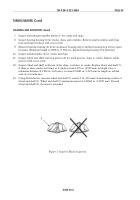
Inspect impeller housing (5) and turbine housing (1) for cracks, chips, and scratches. Use crocus
cloth to remove small scratches and chips from machined surfaces.
4.
Inspect impeller (6) and wheel and shaft (2) vanes for cracks and chips.
5.
Inspect two dowel pins (4) for cracks, chips, and bends.
6.
Inspect V-band clamp (11) for cracks, chips, bends, or separation.
7.
Inspect heat shield (3) for cracks and chips.
8.
Using a straightedge, inspect heat shield (3) for straightness and warpage. Discard heat shield (3)
if warped.
9.
Inspect oil seal plate (7) for cracks, chips or galled bore.
10.
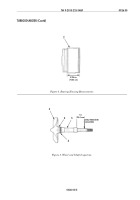
Inspect bearing housing (10) for cracks, chips, and scratches.
11.
Inspect bearing housing (10) for notches in dome area. Discard if notches are found.
12.
Using inside micrometer, measure bearing housing (10) bore inside diameter. Replace bearing
housing (10) if inside diameter is more than 0.876 in. (22.268 mm).
13.
Using feeler gauge, insert outside edge of feeler gauge and new seal ring (13) in wheel and shaft
(2) seal ring grooves. Replace wheel and shaft (2) if seal ring clearance is more than 0.0005 in.
(0.13 mm).
14.
Using micrometer, measure wheel and shaft (2) bearing area outside diameter. Replace wheel and
shaft (2) if bearing area outside diameter is less than 0.5611 in. (14.252 mm).
15.
Using micrometer, measure thrust collar (9) thickness. Replace thrust collar (9) if thickness is less
than 0.0980 in. (2.489 mm).
16.
Using feeler gauge, insert outside edge of feeler gauge and new seal ring (12) in oil slinger (8) seal
ring groove. Replace oil slinger (8) if seal ring clearance is more than 0.0005 in. (0.13 mm).
Back to Top


