TB-9-2510-251-13 - Page 78 of 624
2-62
TB 9-2510-251-13
2-1.2
Installation of Air Conditioning Kit to M1097A2 with GSIE Add-on-Armor (Cont’d).
d. Install Refrigerant Hoses
CAUTION
•
When installing hoses, be sure to secure away from hot or moving parts.
Failure
to comply could result in damage to equipment.
•
Avoid routing hoses in areas where chafing, punctures, or pinching may occur.
Failure to comply could result in damage to equipment.
•
DO NOT remove caps from hoses until ready to charge air conditioner system.
Failure to comply could cause contamination of system and damage to
equipment.
•
Keep all fittings capped until just prior to connecting hoses.
Failure to comply
could result in damage to equipment.
•
Keep ends of hoses covered during routing to avoid contamination.
Failure to
comply could result in damage to equipment.
•
Before connecting fittings, check to see that O-rings are present and undamaged.
Failure to comply could result in damage to equipment.
•
Lubricate O-rings with mineral oil just prior to connecting fittings to components
or inserting fittings into hoses.
Failure to comply could result in damage to
equipment.
NOTE
•
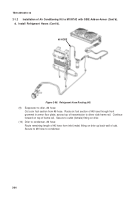
Route hoses according to the diagram shown.
Follow existing routing
and tie strap to secure.
DO NOT connect any hoses at this time.
•
Use hydraulic caps or tape closed ends of hoses to prevent debris from
entering system during routing procedure.
2
4
Figure 2-96.
#8 Hose and #12 Hose
#8 HOSE
#12 HOSE
(1)
Trim grommets to achieve a snug fit around #8 hose.
(2)
Install grommet (2) in hole in transmission tunnel (under evaporator unit).
(3)
Trim grommet to achieve a snug fit around #12 hose.
(4)
Install grommet (1) in hole in bed/transmission tunnel.
Back to Top

