TM-5-2350-377-14-P - Page 196 of 335
TM 5-2350-377-14&P
DISASSEMBLY
NOTE
Tag all electrical leads prior to removal for installation.
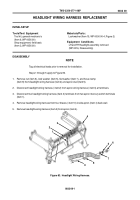
Steps 1 through 5 apply to Figure 83.
1. Remove nut (item 6), lock washer (item 5), flat washer (item 7), and hose clamp
(item 8) from headlight wiring harness (item 2) and apron stud (item 9).
2. Disconnect headlight wiring harness ( item 2) from apron wiring harness ( item 3) at terminals.
3. Disconnect two headlight wiring harness (item 2) terminals from two apron mercury switch terminals
(item 1).
4. Remove headlight wiring harness from four braces ( item 10) inside apron (item 4) back wall.
5. Remove headlight wiring harness (item 2) from apron (item 4).
Figure 83.
Headlight Wiring Harness.
0032 00-1
HEADLIGHT WIRING HARNESS REPLACEMENT
0032 00
INITIAL SETUP
Tools/Test Equipment
Tool kit, general mechanic's
(Item 6, WP 0056 00)
Shop equipment, field basic
(Item 3, WP 0056 00)
Materials/Parts:
Lockwasher (Item 15, WP 0050 00-4, Figure 2)
Equipment Conditions
LH and RH headlight assembly removed
(WP 0016, Disassembly)
1
2
5
4
3
6
7
8
9
10
Back to Top

