TM-9-2320-272-23-2 - Page 1104 of 1417
REMOVAL - Continued
WARNING
Alternator is heavy. Assistant will help with alternator removal. Failure to comply may result
in injury or death to personnel.
8.
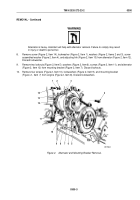
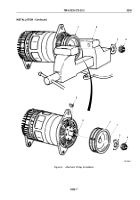
Remove screw (Figure 2, Item 14), lockwasher (Figure 2, Item 1), washers (Figure 2, Items 2 and 3), screw
assembled washer (Figure 2, Item 4), and adjusting link (Figure 2, Item 13) from alternator (Figure 2, Item 12).
Discard lockwasher.
9.
Remove two locknuts (Figure 2, Item 5), washers (Figure 2, Item 6), screws (Figure 2, Item 11), and alternator
(Figure 2, Item 12) from mounting bracket (Figure 2, Item 7). Discard locknuts.
10.
Remove four screws (Figure 2, Item 10), lockwashers (Figure 2, Item 9), and mounting bracket
(Figure
2,
Item
7) from engine (Figure 2, Item 8). Discard lockwashers.
4
3
2
1
14
13
12
11
10
9
8
7
6
5
M0176DAA
Figure 2.
Alternator and Mounting Bracket Removal.
TM 9-2320-272-23-2
0300
0300-3
Back to Top


