TM-9-2320-272-23-2 - Page 1110 of 1417
INSTALLATION - Continued
NOTE
Ensure wire connecting points are thoroughly cleaned before connections are made.
8.
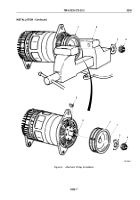
Install wire (Figure 6, Item 2) on alternator (Figure 6, Item 15) with washer (Figure 6, Item 3), lockwasher
(Figure
6, Item
4), and nut (Figure 6, Item 5). Tighten nut 45 to 55 lb-in. (5 to 6 N·m).
9.
Install wire (Figure 6, Item 14) on alternator (Figure 6, Item 15) with washer (Figure 6, Item 13), lockwasher
(Figure 6, Item 12), and nut (Figure 6, Item 11). Tighten nut 20 to 25 lb-in. (2 to 3 N·m).
10.
Connect connector (Figure 6, Item 16) to alternator (Figure 6, Item 15).
11.
Install wire (Figure 6, Item 18) on alternator (Figure 6, Item 15) with lockwasher (Figure 6, Item 19) and screw
(Figure 6, Item 1). Tighten screw 82 to 102 lb-in. (9 to 12 N·m).
NOTE
Wires are held in place with strap.
12.
Install wire retaining strap (Figure 6, Item 6) on alternator (Figure 6, Item 15) with two lockwashers
(Figure
6,
Item
7) and screws (Figure 6, Item 8).
13.
Seal wires (Figure 6, Items 2 and 14) and connectors with gasket sealant.
14.
Install tiedown strap (Figure 6, Item 17) on alternator wires.
10
14
15
16
17
18
19
1
2
3
4
5
6
7
8
9
11
12
13
M0180DAA
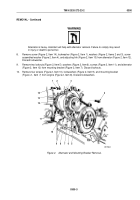
Figure 6.
Alternator and Mounting Bracket Installation.
END OF TASK
TM 9-2320-272-23-2
0300
0300-9
Back to Top


