TM-9-2320-272-23-2 - Page 767 of 1417
INSTALLATION - Continued
NOTE
Assistant will help with Step (4).
4.
Place fuel tank (Figure 5, Item 16) on two hangers (Figure 5, Item 1).
5.
Install two hanger straps (Figure 5, Item 8) on hangers (Figure 5, Item 1) with two screws (Figure 5, Item 21)
and locknuts (Figure 5, Item 22).
6.
Install outer ends of two hanger straps (Figure 5, Item 8) on hangers (Figure 5, Item 1) with two locknuts
(Figure
5,
Item
10).
7.
Install ground wire (Figure 5, Item 4) on fuel transmitter unit (Figure 5, Item 15) with screw (Figure 5, Item 3).
8.
Install fuel transmitter wire (Figure 5, Item 2) to fuel transmitter unit (Figure 5, Item 15).
9.
Connect fuel supply line (Figure 5, Item 5) to elbow (Figure 5, Item 14).
10.
Connect fuel return line (Figure 5, Item 13) to elbow (Figure 5, Item 12).
11.
Connect vent lines (Figure 5, Item 16 and 17) to elbows (Figure 5, Item 7).
M10005DAA
8
9
10
11
12
13
14
8
15
6
7
16
17
8
18
1
7
6
5
4
3
2
1
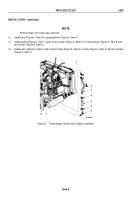
Figure 5.
Fuel Tank Installation.
TM 9-2320-272-23-2
0250
0250-6
Back to Top


