TM-9-2320-272-23-3 - Page 1375 of 1469
REMOVAL - Continued
NOTE
Assistants will help with Steps (7) through (10).
7.
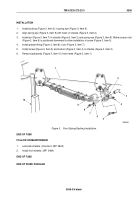
Remove two nuts (Figure 3, Item 15), washers (Figure 3, Item 14), U-bolt (Figure 3, Item 5), and U-bolt bracket
(Figure 3, Item 8) from spring brake chamber (Figure 3, Item 13).
8.
Remove nut (Figure 3, Item 9), lockwasher (Figure 3, Item 10), washer (Figure 3, Item 11), screw
(Figure
3,
Item
1), washer (Figure 3, Item 2), and spring brake chamber bracket (Figure 3, Item 12) from
upper spring bracket and wear pad (Figure 3, Item 4). Discard lockwasher.
9.
Remove two nuts (Figure 3, Item 7), lockwashers (Figure 3, Item 6), and screws (Figure 3, Item 3) from upper
spring bracket and wear pad (Figure 3, Item 4). Discard lockwashers.
M10170DAA
5
6
7
8
9
10
11
12
13
14
15
1
2
3
4
Figure 3.
Rear Spring Removal.
TM 9-2320-272-23-3
0539
0539-4
Back to Top


