TM-9-2320-272-23-4 - Page 1017 of 1393
REMOVAL
CAUTION
When disconnecting hydraulic hoses and tubes, plug all openings to prevent dirt from entering
and causing internal parts damage.
NOTE
•
Do not twist hose during removal or attempt to remove hose with one wrench.
•
Hose fitting ends connected by a single hexagonal nut cannot be disconnected until the
flare nut connected at the opposite end is removed. The entire hose must be free to turn
whenever removing hose connected by a single hexagonal nut.
•
Tag all hoses and lines for installation.
•
Have drainage container ready to catch oil.
•
Use drain pans to retain leaking/draining fluids. Refer to local procedures and plans for
preventing and responding to fluid spills or leaks. Comply with local regulations when
disposing of clean up material and leaked and spilled fluids.
1.
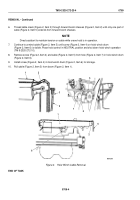
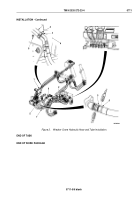
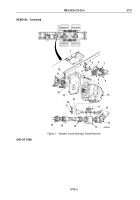
Remove locknut (Figure 1, Item 8), clamp (Figure 1, Item 2), hose (Figure 1, Item 7), and/or tube
(Figure
1,
Item
1) from bracket (Figure 1, Item 3) and wrecker body (Figure 1, Item 4). Discard locknut.
2.
Position wrenches on hexagonal fitting (Figure 1, Item 6) and flare nut (Figure 1, Item 5).
3.
Holding hexagonal fitting (Figure 1, Item 6) in place, loosen flare nut (Figure 1, Item 5), and disconnect hose
(Figure 1, Item 7) and/or tube (Figure 1, Item 1) from hexagonal fitting.
4.
Repeat Steps (1) through (3) for remaining hoses (Figure 1, Item 7) and/or tubes (Figure 1, Item 1).
TM 9-2320-272-23-4
0711
0711-2
Back to Top

