TM-9-2320-272-23-4 - Page 1007 of 1393
REMOVAL - Continued
6.
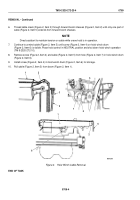
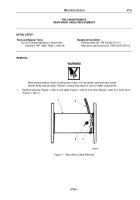
Thread cable clevis (Figure 2, Item 3) through forward boom sheaves (Figure 2, Item 2) until only one part of
cable (Figure 2, Item 5) extends from forward boom sheaves.
NOTE
Direct assistant to maintain tension on cable while crane hoist is in operation.
7.
Continue to unwind cable (Figure 2, Item 5) until screw (Figure 2, Item 4) on hoist winch drum
(Figure 2, Item 6) is visible. Place hoist control in NEUTRAL position and shut down hoist winch operation
(TM 9-2320-272-10).
8.
Remove screw (Figure 2, Item 4) and cable (Figure 2, Item 5) from hole (Figure 2, Item 7) in hoist winch drum
(Figure 2, Item 6).
9.
Install screw (Figure 2, Item 4) in hoist winch drum (Figure 2, Item 6) for storage.
10.
Pull cable (Figure 2, Item 5) from boom (Figure 2, Item 1).
2
3
4
M9740DAA
1
5
5
7
6
5
2
6
1
Figure 2.
Hoist Winch Cable Removal.
END OF TASK
TM 9-2320-272-23-4
0709
0709-4
Back to Top

