TM-9-2320-283-13-P - Page 217 of 400
TM 9-2320-283-13&P
0027
0027-3
0027-3
REMOVAL – CONTINUED
9.
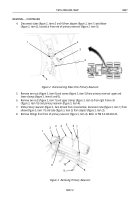
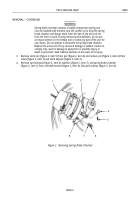
Remove plug (figure 4, item 1) from rear of primary reservoir (figure 4, item 2).
10.
Remove adapter (figure 4, item 5) from reducer bushing (figure 4, item 6), and remove adapter
(figure 4, item 3) from elbow (figure 4, item 4).
11.
Remove reducer bushing (figure 4, item 6) and elbow (figure 4, item 4) from tee (figure 4, item 7), and
remove tee (figure 4, item 7) from rear of primary reservoir (figure 4, item 2).
1
2
3
4
5
6
7
Figure 4. Removing Fittings from Rear of Primary Reservoir.
END OF TASK
INSTALLATION
WARNING
Ensure all nuts on air tube fittings are properly tightened during
installation. Refer to WP 0021. Failure to comply may result in
damage to equipment or possible injury to personnel. Seek medical
attention in the event of an injury.
NOTE
Prior to installation, ensure pipe joint compound is applied to male
pipe threads of NPT fittings only.
1.
Install tee (figure 4, item 7) on rear of primary reservoir (figure 4, item 2), and install reducer bushing
(figure 4, item 6) and elbow (figure 4, item 4) on tee (figure 4, item 7).
2.
Install adapter (figure 4, item 5) on reducer bushing (figure 4, item 6), and install adapter
(figure 4, item 3) on elbow (figure 4, item 4).
3.
Install plug (figure 4, item 1) on rear of primary reservoir (figure 4, item 2).
Back to Top


