TM-9-2330-202-13-P - Page 295 of 552
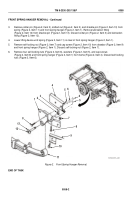
FRONT SPRING HANGER INSTALLATION
1.
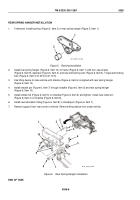
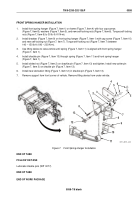
Install front spring hanger (Figure 7, Item 1) on frame (Figure 7, Item 4) with four cap screws
(Figure 7, Item 8), washers (Figure 7, Item 5), and new self-locking nuts (Figure 7, Item 6). Torque self-locking
nuts (Figure 7, Item 6) to 30 lb-ft (41 N•m).
2.
Install drawbar (Figure 7, Item 9) on front spring hanger (Figure 7, Item 1) with cap screw (Figure 7, Item 10)
and new self-locking nut (Figure 7, Item 7). Torque self-locking nut (Figure 7, Item 7) between
140 – 150 lb-ft (190 – 203 N•m).
3.
Use lifting device to raise vehicle until spring (Figure 7, Item 11) is aligned with front spring hanger
(Figure 7, Item 1).
4.
Install shackle pin (Figure 7, Item 13) through spring (Figure 7, Item 11) and front spring hanger
(Figure 7, Item 1).
5.
Install slotted nut (Figure 7, Item 2) on shackle pin (Figure 7, Item 13) and tighten. Install new cotter pin
(Figure 7, Item 3) on shackle pin (Figure 7, Item 13).
6.
Install new lubrication fitting (Figure 7, Item 12) in shackle pin (Figure 7, Item 13).
7.
Remove support from front corner of vehicle. Remove lifting device from under vehicle.
1
2
3
4
5
5
6
7
8
8
9
10
11
12
13
M116_M101_4-96
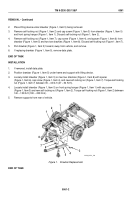
Figure 7.
Front Spring Hanger Installation.
END OF TASK
FOLLOW ON TASK
Lubricate shackle pins (WP
0077).
END OF TASK
END OF WORK PACKAGE
TM 9-2330-202-13&P
0058
0058-7/8 blank
Back to Top

