TM-9-2330-202-13-P - Page 291 of 552
REAR SPRING HANGER REMOVAL
1.
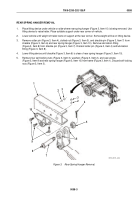
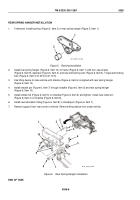
Place lifting device under vehicle on side where rear spring hanger (Figure 3, Item 10) is being removed. Use
lifting device to raise trailer. Place suitable support under rear corner of vehicle.
2.
Lower vehicle until weight of trailer rests on support at the rear corner. Some weight will be on lifting device.
3.
Remove cotter pin (Figure 3, Item 4), slotted nut (Figure 3, Item 5), and shackle pin (Figure 3, Item 7) from
shackle (Figure 3, Item 6) and rear spring hanger (Figure 3, Item 10). Remove lubrication fitting
(Figure 3, Item 8) from shackle pin (Figure 3, Item 7). Discard cotter pin (Figure 3, Item 4) and lubrication
fitting (Figure 3, Item 8).
4.
Lower lifting device until shackle (Figure 3, Item 6) is clear of rear spring hanger (Figure 3, Item 10).
5.
Remove four self-locking nuts (Figure 3, Item 3), washers (Figure 3, Item 2), and cap screws
(Figure 3, Item 9) and rear spring hanger (Figure 3, Item 10) from frame (Figure 3, Item 1). Discard self-locking
nuts (Figure 3, Item 3).
1
2
2
3
3
4
5
6
7
8
9
10
M116_M101_4-94
Figure 3.
Rear Spring Hanger Removal.
TM 9-2330-202-13&P
0058
0058-3
Back to Top

