TM-9-2330-202-13-P - Page 297 of 552
FIELD MAINTENANCE
LIFT SHACKLE REPLACEMENT
INITIAL SETUP:
Tools and Special Tools
Tool Kit, General Mechanic's
(WP
0115, Table 1, Item 1)
Materials/Parts
Cotter pin (WP
0096, Figure 15, Item 7)
Self-locking nut (WP
0096, Figure 15, Item 7)
REMOVAL
1.
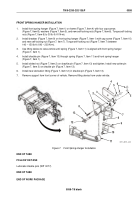
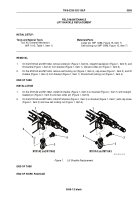
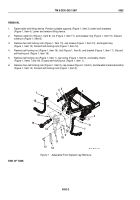
On the M101A2 and M116A2, remove cotter pin (Figure 1, Item 6), straight headed pin (Figure 1, Item 5), and
lift shackle (Figure 1, Item 3) from bracket (Figure 1, Item 1). Discard cotter pin (Figure 1, Item 6).
2.
On the M101A3 and M116A3, remove self-locking nut (Figure 1, Item 4), cap screw (Figure 1, Item 2), and lift
shackle (Figure 1, Item 3) from bracket (Figure 1, Item 1). Discard self-locking nut (Figure 1, Item 4).
END OF TASK
INSTALLATION
1.
On the M101A2 and M116A2, install lift shackle (Figure 1, Item 3) on bracket (Figure 1, Item 1) with straight
headed pin (Figure 1, Item 5) and new cotter pin (Figure 1, Item 6).
2.
On the M101A3 and M116A3, install lift shackle (Figure 1, Item 3) on bracket (Figure 1, Item 1) with cap screw
(Figure 1, Item 2) and new self-locking nut (Figure 1, Item 4).
1
1
2
3
3
4
5
6
M101A2 and M116A2
M101A3 and M116A3
M116_M101_4-97
Figure 1.
Lift Shackle Replacement.
END OF TASK
END OF WORK PACKAGE
TM 9-2330-202-13&P
0059
0059-1/2 blank
Back to Top

