TM-9-2330-202-13-P - Page 290 of 552
FRONT SPRING HANGER REMOVAL - Continued
3.
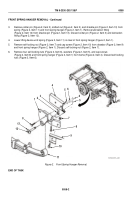
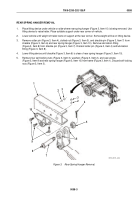
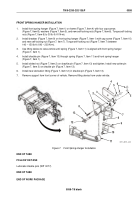
Remove cotter pin (Figure 2, Item 3), slotted nut (Figure 2, Item 2), and shackle pin (Figure 2, Item 13) from
spring (Figure 2, Item 11) and front spring hanger (Figure 2, Item 1). Remove lubrication fitting
(Figure 2, Item 12) from shackle pin (Figure 2, Item 13). Discard cotter pin (Figure 2, Item 3) and lubrication
fitting (Figure 2, Item 12).
4.
Lower lifting device until spring (Figure 2, Item 11) is clear of front spring hanger (Figure 2, Item 1).
5.
Remove self-locking nut (Figure 2, Item 7) and cap screw (Figure 2, Item 10) from drawbar (Figure 2, Item 9)
and front spring hanger (Figure 2, Item 1). Discard self-locking nut (Figure 2, Item 7).
6.
Remove four self-locking nuts (Figure 2, Item 6), washers (Figure 2, Item 5), and cap screws
(Figure 2, Item 8) and front spring hanger (Figure 2, Item 1) from frame (Figure 2, Item 4). Discard self-locking
nuts (Figure 2, Item 6).
1
2
3
4
5
5
6
6
7
9
10
11
12
13
8
8
M116_M101_4-93
Figure 2.
Front Spring Hanger Removal.
END OF TASK
TM 9-2330-202-13&P
0058
0058-2
Back to Top

