TM-9-2330-227-14-P - Page 248 of 576
4-162
TM 9-2330-227-14&P
BLACKOUT PANELS - CONTINUED
ACTION
LOCATION
ITEM
REMARKS
NOT E
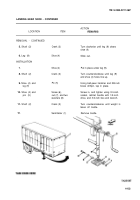
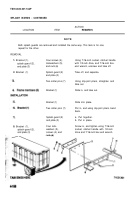
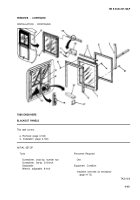
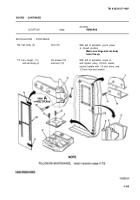
All panels are removed and installed the same way. This task is for one; repeat for the
others.
REMOVAL
1.
Lower corners of
Two screws (2),
Using number two cross-tip screwdriver
two brackets (1)
flat washers (3),
and 8-inch adjustable wrench, unscrew
Iockwashers (4),
and take off.
and nuts (5)
2.
Panel (6)
Slide out.
3.
Panel (6)
Four strips (7)
Take off.
4.
Two brackets (1)
Eight screws (9),
Using number two cross-tip screwdriver
and van body (8)
flat washers (10),
and 8-inch adjustable wrench, unscrew
Iockwashers (11),
and take off.
and nuts (12)
5.
Van body (8)
Two brackets (1)
Take off.
INSTALLATION
6.
7.
Two brackets (1)
and van body (8)
8.
Panel (6)
9.
Two brackets (1)
10.
Two brackets (1)
Eight screws (9),
flat washers (10),
Iockwashers (11),
and nuts (12)
Four strips (7)
Panel (6)
Two screws (2),
flat washers (3),
Iockwashers (4),
and nuts (5)
Put in place.
Screw in, and tighten using number two
cross-tip screwdriver and 8-inch
adjustable wrench.
Put in place.
Slide in place.
Screw in, and tighten using number two
cross-tip screwdriver and 8-inch
adjustable wrench.
Back to Top

