TM-9-2330-227-14-P - Page 340 of 576
5-66
TM 9-2330-227-14&P
U-BOLTS, RADIUS ROD AND BRACKET, AND SPRING - CONTINUED
ACTION
LOCATION
ITEM
REMARKS
REMOVAL - CONTINUED
16.
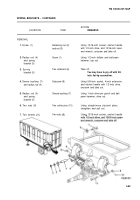
Axle (1)
INSTALLATION
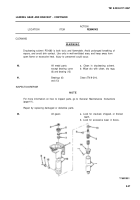
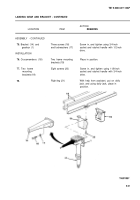
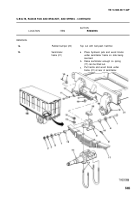
Radius rod
bracket (3)
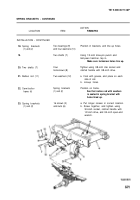
Spring bracket (6)
Radius rod (7)
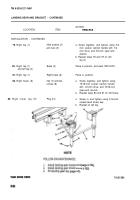
Spring (2) and
radius rod (7)
Radius rod (7)
and spring
bracket (6)
Sleeve
bushing (9)
Spring bracket (6)
Radius rod (7) and
spring bracket (6)
Screw (12)
Spring (2)
Spring (2)
Rubber bumper (4)
Two rubber
bushings (5)
Radius rod (7)
Four washers (8)
Radius rod
bracket (3)
Sleeve
bushing (9)
Setscrew (10)
Two retainers (11)
Screw (12)
Nut (13) and
retaining nut (14)
Semitrailer
frame (15)
With help from assistant, lift off.
With help from assistant, put in position.
If removed, using ball-peen hammer,
tap in.
If removed, using ball-peen hammer,
tap in place.
Put in position.
a.
b.
a.
b.
Coat with grease to keep in place.
Position on each side of radius rod (7).
Locate over end of radius rod, and
position on spring (2).
Aline U-bolt holes.
Using 1-inch drive-pin punch and ball-
peen hammer, tap in.
Make sure setscrew hole in bushing
lines up with setscrew hole in radius
rod.
Screw in, and tighten using 5/8-inch
socket, 4-inch extension, and ratchet
handle with 1/2-inch drive.
Place on each side.
Using ball-peen hammer and 1/2-inch
driftpin, tap through.
a.
b.
a.
Screw on, and tighten using 15/16-inch
socket, ratchet handle with 1/2-inch
drive, and 15/16-inch open-end
wrench.
Repeat steps 23 thru 27a for other
end of radius rod (7).
Take trestle out from under frame (15).
Back to Top

