TM-9-2330-342-23-P - Page 654 of 1348
REMOVAL - Continued
WARNING
Brake shoe springs are under great tension, wear eye protection and use caution when
removing springs during this procedure. Failure to comply may result in injury or death to
personnel.
CAUTION
When one brake shoe needs to be replaced, all brake shoes for that axle must be replaced.
Damage to equipment could occur.
NOTE
Use a pry bar to raise or lower brake shoes from rollers or pins.
1.
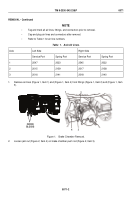
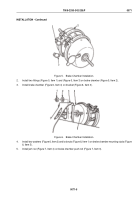
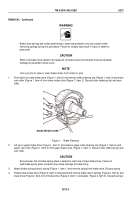
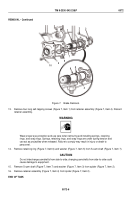
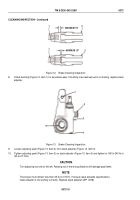
Push down on lower brake shoe (Figure 1, Item 2) and remove roller retaining clip (Figure 1, Item 3) and lower
cam roller (Figure 1, Item 4) from lower brake shoe (Figure 1, Item 2). Discard roller retaining clip and cam
roller.
BRAKE REPAIR PLIERS
1
2
3
4
5
6
7
Figure 1.
Brake Removal.
2.
Lift up on upper brake shoe (Figure 1, Item 7) and remove upper roller retaining clip (Figure 1, Item 6) and
upper cam roller (Figure 1, Item 5) from upper brake shoe (Figure 1, Item 7). Discard roller retaining clip and
cam roller.
CAUTION
Ensure lower fork of brake spring pliers is seated in rivet hole of lower brake shoe. Failure to
seat brake spring pliers correctly may cause damage to brake lining.
3.
Attach brake spring pliers to spring (Figure 1, Item 1) and remove spring from brake shoe. Discard spring.
4.
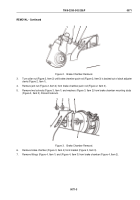
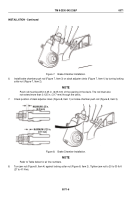
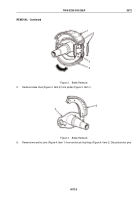
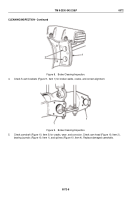
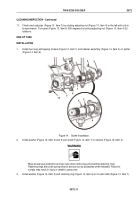
Rotate lower brake shoe (Figure 2, Item 4) downward and remove brake return springs (Figure 2, Item 2) and
lower shoe (Figure 2, Item 4) from brake shoe (Figure 2, Item 1) and spider (Figure 2, Item 3). Discard springs.
TM 9-2330-342-23&P
0072
0072-2
Back to Top


