TM-9-2350-261-34 - Page 408 of 785
TM 9-2350-261-34
REPAIR AUXILIARY POWER UNIT COVER (4.2 KW GENERATOR SET
ONLY) (M577A2 ONLY) — Continued
0057 00
4.
Center patch over damaged area. Apply adhesive to patch and patch edge, making a circle on fabric with soft bristle
brush.
5.
Lift patch. Apply adhesive to area of fabric inside adhesive circle.
6.
Allow adhesive to dry until tacky (about 10 minutes).
7.
Press cement surfaces together firmly with roller while tacky.
8.
Seal by wiping edge of patch with soft bristle brush.
9.
Install or repair webbing using machine stitching in a square pattern with diagonal stitches from corner to corner.
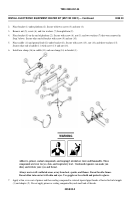
10. Repair hardware as shown in the following figure. See FM 10-16 for installation of eyelets and studs with washers.
NOTE
Use lock stitching when you install patches, flaps, and straps or repair open seams. Use
polyester thread and smallest needle you can to make weatherproof seams. Allow 5 to 7 stitches
per inch (3 cm). Backstitch all thread breaks at least 1 inch (3 cm). Backstitch all ends at least 1
inch (3 cm), except where ends are turned under in a hem or seam or held down by other
stitching. Maintain thread tension so stitching is tight and lock is fixed firmly in center of
material. Trim all ends. Take care when re-stitching to make a new stitch line.
11. Repair extensive damage between seams. See Steps 12 - 22.
12. Open seam 2 inches (5 cm) beyond damaged area on both sides.
13. Square off damaged area from seam to seam.
14. Cut patch 2 inches (5 cm) wider than squared-off section. Allow for 3/4 inch (19 mm) turn under on sides.
15. Center patch over cutaway section. Turn sides under, and reform double-felled seams at top and bottom.
005700-3
Back to Top


