TM-9-2540-207-14-P - Page 109 of 288
TM 9-2540-207-14&P
5-65
5.8.3
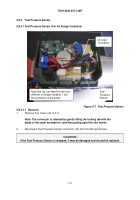
Vent Sensor Assembly (Applies to all Design Iterations)
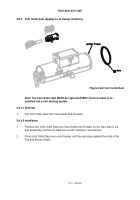
Figure 5.8-5 Vent Sensor Assembly
5.8.3.1 Removal
Note: For Steps 1-5, set the heater on the Vent Sensor End.
If fuel has
collected in the heat exchanger, it must be properly disposed of in
accordance with the local regulations.
1.
Remove Top Shell (ref. 5.4.2).
2.
Remove Bottom Shell (ref. 5.4.3).
3.
Disconnect the Logic Harness end of the Vent Sensor Connector from the Vent Sensor
Connector (J5).
Note:
The Vent Sensor Connector has a self locking tab that needs to be
lifted to allow the two halves of the connector to come apart.
4.
Using a 5/16" socket or nut driver, remove the single hex head bolt (from the Burner
Housing to the Heat Exchanger) which secures the Vent Sensor Connector (J5) Clip.
5.
Gently pry open the channel on the side of the Heat Exchanger and remove the Vent
Sensor wire.
Tip: Set the heater on its side with the Fuel Inlet facing Upwards.
If
possible have the Vent Sensor ONLY overhang the edge of the work bench.
6.
Using a #2 cross-tip screwdriver, remove the three (3) screws from the Vent Sensor.
Gently pull the Vent Sensor away from the Heat Exchanger.
Back to Top

