TM-5-2350-377-13-P - Page 150 of 404
INSTALLATION
1.
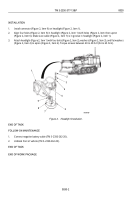
Install connector (Figure 2, Item 9) on headlight (Figure 2, Item 1).
2.
Align four holes (Figure 2, Item 5) in headlight (Figure 2, Item 1) with holes (Figure 2, Item 8) on apron
(Figure 2, Item 6). Make sure cable (Figure 2, Item 7) is in groove in headlight (Figure 2, Item 1).
3.
Attach headlight (Figure 2, Item 1) with four bolts (Figure 2, Item 2), washers (Figure 2, Item 3), and flat washers
(Figure 2, Item 4) to apron (Figure 2, Item 6). Torque screws between 40 to 45 lb-ft (54 to 65 N·m).
3
1
M0004HBF
2
4
5
6
7
8
9
Figure 2.
Headlight Installation.
END OF TASK
FOLLOW-ON MAINTENANCE
1.
Connect negative battery cable (TM 5-2350-262-20).
2.
Unblock front of vehicle (TM 5-2350-262-20).
END OF TASK
END OF WORK PACKAGE
TM 5-2350-377-13&P
0030
0030-2
Back to Top


