TM-5-2350-377-13-P - Page 153 of 404
INSTALLATION - Continued
2.
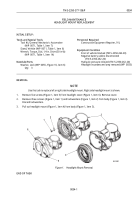
With thick side of gasket (Figure 4, Item 3) facing forward, put gasket (Figure 4, Item 3) and lens
(Figure 4, Item 4) all the way in lens holder (Figure 4, Item 2) until they seat firmly.
3.
Put plate spacer (Figure 4, Item 6) on holder (Figure 4, Item 2). Install four captive screws (Figure 4, Item 5)
on headlight (Figure 4, Item 1).
4
M0008HBF
2
1
3
5
6
Figure 4.
Headlight Plate Spacer Installation.
END OF TASK
FOLLOW-ON MAINTENANCE
1.
Connect negative battery cable (TM 5-2350-262-20).
2.
Unblock front of vehicle (TM 5-2350-262-20).
END OF TASK
END OF WORK PACKAGE
TM 5-2350-377-13&P
0031
0031-3/4 blank
Back to Top


