TM-5-5420-228-24 - Page 476 of 750
TM 5-5420-228-24
HEU DEPRESSURIZATION MANIFOLD REPLACEMENT (Sheet 1 of 2)
PROCEDURE INDEX
P
r
o
c
e
d
u
r
e
s
P
a
g
e
Removal
3-204.75
Installation
3-204.76
TOOLS:
12-in. Adjustable wrench
1/2-inch drive ratchet
1 3/8-in. open end wrench
9/16-in. socket with 1/2-inch drive
6-in. extension with 1/2-inch drive
11/16-in. open end wrench
15/16-in. open end wrench
SUPPLIES:
Drip pans (suitable containers)
Protective caps and plugs (assorted sizes)
Rags (Item 12, Appendix D)
Pencil (Item 22, Appendix D)
Masking tape (Item 18, Appendix D)
Preformed packing (as required)
REFERENCE: LO-12
PRELIMINARY PROCEDURES:
Zero hydraulic pressure (page 3-70.5)
REMOVAL:
NOTE
Use rags and drip pans to catch excess hydraulic fluid.
Cap or plug all lines and
fittings as they are disconnected.
1.
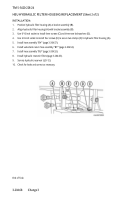
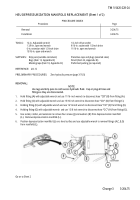
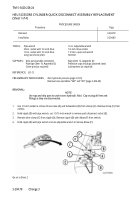
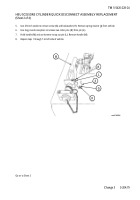
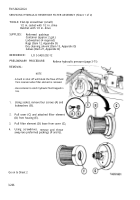
Hold fitting (A) with adjustable wrench and use 11/16- inch wrench to disconnect hose “CB” (B) from fitting (A).
2.
Hold fitting (C) with adjustable wrench and use 15/16 inch wrench to disconnect hose “CD” (D) from fitting (C).
3.
Holding fitting (E) with adjustable wrench and use 15/16 inch wrench to disconnect hose “CE” (F) from fitting (E).
4.
Holding fitting (G) with adjustable wrench
and use 1 3/8 inch wrench to disconnect hose “CC” (H) from fitting (G).
5.
Use socket, ratchet, and extension to remove four screws (J) and washers (K) from depressurization manifold
(L).
Remove depressurization manifold (L).
6.
Position depressurization manifold (L) on a level surface and use adjustable wrench to remove fittings (A,C,E,G)
from manifold (L).
Go on to Sheet 2
Change 3
3-204.75
K
L
Back to Top

