TM-9-2320-272-23-3 - Page 1411 of 1469
UPPER TORQUE ROD REMOVAL - Continued
7.
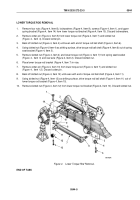
Place upper torque rod (Figure 3, Item 2) and bracket (Figure 3, Item 3) in vise (Figure 3, Item 5).
8.
Remove cotter pin (Figure 3, Item 1) and back off slotted nut (Figure 3, Item 6) until even with end of ball shaft
(Figure 3, Item 4). Discard cotter pin.
9.
Using nut (Figure 3, Item 6) as striking surface, drive torque rod ball shaft (Figure 3, Item 4) out of upper bracket
(Figure 3, Item 3).
10.
Remove slotted nut (Figure 3, Item 6) from ball shaft (Figure 3, Item 4). Discard slotted nut.
M10205DAA
1
6
5
3
4
2
Figure 3.
Upper Torque Rod Removal.
END OF TASK
TM 9-2320-272-23-3
0544
0544-4
Back to Top


