TM-9-2320-272-23-5 - Page 185 of 623
REMOVAL
NOTE
•
Have drainage container ready to catch oil.
•
Use drain pans to retain leaking/draining fluids. Refer to local procedures and plans for
preventing and responding to fluid spills or leaks. Comply with local regulations when
disposing of clean up material and leaked and spilled fluids.
1.
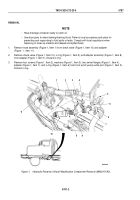
Remove hose assembly (Figure 1, Item 1) from check valve (Figure 1, Item 10) and adapter
(Figure
1,
Item
11).
2.
Remove check valve (Figure 1, Item 10), o-ring (Figure 1, Item 9), and adapter assembly (Figure 1, Item 8)
from adapter (Figure 1, Item 7). Discard o-ring.
3.
Remove four screws (Figure 1, Item 2), washers (Figure 1, Item 3), two swivel flanges (Figure 1, Item 4),
adapter (Figure 1, Item 7), and o-ring (Figure 1, Item 6) from front winch pump outlet port (Figure 1, Item 5).
Discard o-ring.
M6292DAA
8
9
10
1
11
2
3
4
5
6
4
7
Figure 1.
Hydraulic Reservoir Shutoff Modification Component Removal (M936/A1/A2).
TM 9-2320-272-23-5
0787
0787-2
Back to Top


