TM-9-2320-328-13-P-2 - Page 748 of 1390
TM 9-2320-328-13&P-2
0217-2
DRAFT
0217
Change 1
-
-
-
-
-
-
-
-
-
-
-
-
-
-
-
-
-
-
-
-
-
-
-
-
-
-
-
-
-
-
-
-
-
-
-
-
-
-
NOTE
•
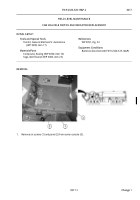
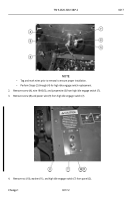
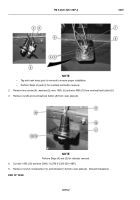
Tag and mark wires prior to removal to ensure proper installation.
•
Perform Steps (2) through (4) for high idle engage switch replacement.
2.
Remove screw (4), wire 1840 (5), and jumperwire (6) from high idle engage switch (7).
3.
Remove screw (8) and power wire (9) from high idle engage switch (7).
-
-
-
-
-
-
-
-
-
-
-
-
-
-
-
-
-
-
-
-
-
-
-
-
-
-
-
-
-
-
-
-
-
-
-
-
-
-
4.
Remove nut (10), washer (11), and high idle engage switch (7) from panel (2).
HWT2057
.
.
.
.
.
.
.
.
.
.
.
.
.
.
.
.
.
.
.
.
.
.
.
.
.
.
.
.
.
.
.
.
.
.
.
.
.
.
.
.
.
.
.
.
.
.
.
HWT3392
Back to Top

