TM-9-2320-361-20 - Page 171 of 1207
TM 9-2320-361-20
Table 2-4. Electrical Troubleshooting (Contd).
MALFUNCTION
TEST OR INSPECTION
CORRECTIVE ACTION
3. STARTER MOTOR OPERATES, BUT ENGINE CRANKS SLOWLY
NOTE
Test 1.
Test 2.
If STE/ICE is available, perform NG80 - starter circuit tests
(chapter 2, section VII).
Check batteries for overheating by cranking engine for 15 seconds and feeling battery
terminal connections.
If battery terminal is hot, a loose or corroded connection is indicated.
a. Clean corroded connection to bright metal.
b. Tighten all loose connections at batteries, ground, and starter.
Test specific gravity for each battery.
Perform a specific gravity test (TM 9-6140-200-14), Batteries must test 1.255 or greater,
temperature corrected, and each cell in a battery must test within 0.025 points of the others.
a. Charge all batteries not meeting requirements (TM 9-6140-200-14) and check specific
gravity again.
b. If 0.025 point variation still exists within any battery, it is defective and must be
replaced (para. 4-49).
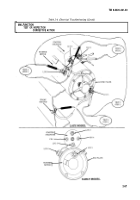
Test starter motor voltage.
Test 3.
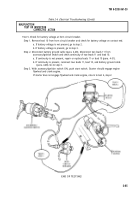
Step 1. Set multimeter to a voltage range that will measure 24 Vdc.
Step 2. Connect multimeter positive lead to positive terminal lug 6 of starter motor and negative
lead to terminal lug 5 on end plate of starter motor.
Step 3. Crank engine (TM 9-2320-361-10) and observe cranking voltage on multimeter. Voltage
should exceed 19 Vdc.
If voltage is less than 19 Vdc, clean and tighten starter motor connections.
Test 4. Test starter motor-to-solenoid strap voltage drop.
Step 1. Set multimeter to a voltage range that will measure tenths of a volt.
Step 2. Connect multimeter negative lead to positive terminal lug 6 of starter motor and
multimeter positive lead to starter motor solenoid terminal lug 3.
Step 3. Crank engine (TM 9-2320-361-10) and observe multimeter. A voltage reading exceeding 0.2
volts indicates a bad connection at starter motor terminal lug 3 and terminal lug 6 of solenoid.
Clean and tighten connections.
Test 5. Test starter motor solenoid contact voltage drop.
Step 1. Set multimeter to a voltage range that will measure tenths of a volt.
Step 2. Connect multimeter between starter motor solenoid terminal lugs 3 and 2.
Step 3. Crank engine (TM 9-2320-361-10) and observe multimeter. A voltage reading exceeding 0.4
volts indicates a defective starter motor solenoid.
a. Replace starter motor and solenoid assembly (para. 4-7).
b. If malfunction still exists, go to tests 6, 7, and 8.
Test 6. Test negative cable 7 voltage drop from batteries to starter motor.
Step 1.
Step 2.
Step 3.
Set multimeter to voltage range that will measure tenths of a volt.
Connect multimeter positive lead to terminal stud on end plate of starter motor and
negative lead to frame ground.
Crank engine (TM 9-2320-361-10) and observe multimeter. A voltage reading exceeding 0.4
volts indicates a defective starter motor solenoid.
a. Replace starter motor and solenoid assembly (para. 4-7).
b. If malfunction still exists, go to tests 7 and 8.
2-86
Back to Top

