TM-9-2330-356-14
SEMITRAILER, TANK: 5000 GALLON, BULK HAUL, SELF LOAD/UNLOAD M967 AND M967A1; SEMITRAILER, TANK: 5000 GALLON, FUEL DISPENSING, AUTOMOTIVE M969 AND M969A1; SEMITRAILER, TANK: 5000 GALLON, FUEL DISPENSING, UNDER/OVERWING AIRCRAFT M970 AND M970A1
TECHNICAL MANUAL; OPERATOR’S, UNIT, DIRECT SUPPORT, AND GENERAL SUPPORT MAINTENANCE MANUAL
OCTOBER 1990
TM-9-2330-356-14 - Page 195 of 528
TM 9-2330-356-14
e .
Charging Battery.
WARNING
Batteries produce explosive gases. Keep
sparks, flame, and smoking material away.
Ventilate when charging or using in an
enclosed space.
The batteries contain sulfuric acid that
causes severe burns. If acid contacts eyes,
skin, or clothing, flush well with water. For
contact with eyes, get immediate medical
attention.
CAUTION
Always disconnect negative cables first.
(1) Remove
batteries from vehicle when
necessary to charge in accordance with TM 9-6140-
200-14.
(2) If dry batteries are used and vehicle is not
placed in immediate service, slow charge with charger at
not more than 10 amperes. Charge until cells gas freely or
until electrolyte exceeds 120 ‘F. Reduce charge rate by ½
on each occurrence to remain within the restrictions,
topping off at a 1 ampere rate. To fully charge, top off until
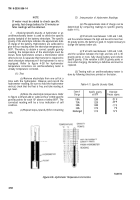
each cell has less than a 25 point variation and an average
specific gravity of 1.280 to 1.290, corrected (fig. 4-38),
measured in three readings spaced at ½ hour intervals.
f.
Installation of Battery.
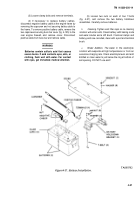
(1) Position batteries on engine frame with
positive’ posts closest to the engine.
holddown assemblies securely on battery.
CAUTION
Batteries to be connected in parallel only.
(2) Position and secure the clamp of the positive
battery cable (48-inch long) on the positive battery post. If
cable has been completely removed, secure the other end
of cable to the buss bar (fig. 4-27) with a bolt, washer, and
nut. Replace buss bar cover.
(3) Position and secure the clamp of the negative
battery cable on the negative battery post. If cable has
been completely removed, secure the other end of cable to
engine frame (ground) with capscrew and nut.
(4) Position battery cover on battery holddowns
and secure with wingnuts and washers (fig. 4-37).
Section IX. MAINTENANCE OF ENGINE CONTROL PANEL
4-24.
a.
Switches, Gages, and Indicator Light
WARNING
When troubleshooting an electrical mal-
function or performing electrical mainte-
nance, ALWAYS disconnect intervehicular
electrical cable from semitrailer, and nega-
tive battery cables at batteries. Failure to
follow this warning may create a spark and
explosion, resulting in serious injury or
death to personnel.
Check for fuel leaks at gage tube
connections before performing electrical
testing at control panel. Stop any leaks and
wipe up spills.
Testing Instruments, Switches, and Indicator Light.
When an instrument shows an abnormal indication, the
trouble should be checked immediately and either
corrected or referred to proper authority to make the
necessary correction. If operation of the engine, pump, or
Place battery
filter/separator indicates no trouble and the instrument is
suspected of being defective, replace it with a new
instrument, known to be good, if available. Other tests can
be made as follows:
(1) Make a continuity test of wiring and switches
using a multimeter (para 4-9).
(2) Visually check instruments for broken glass,
damaged terminals, corrosion, and damage to cases and
capillary tubes. Check wiring for broken or damaged
insulation and for broken wires. Check couplings and lines
to pump, filter/separator, and fuel and oil gages for
looseness and damage.
(3) Check conduit at back of panel for kinks or
breaks. Check conduit fittings for tightness. Make sure
decals are in place, clean, and readable. Check that all
switches are tight and no fasteners are missing or loose.
b.
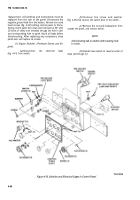
Replacement of Switches, Instruments, and Indicator
Light.
Refer to figure 2-9 for location of switches and
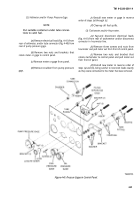
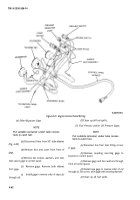
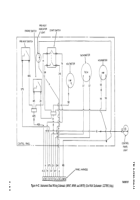
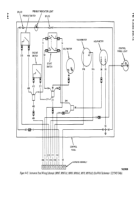
instruments on the control panel. Refer to figures 4-39,
4-40, and 4-41, and engine control panel electrical
schematic diagram (figs. 4-42 and 4-43) as a guide for
4-59
Back to Top

