TM-9-2330-356-14
SEMITRAILER, TANK: 5000 GALLON, BULK HAUL, SELF LOAD/UNLOAD M967 AND M967A1; SEMITRAILER, TANK: 5000 GALLON, FUEL DISPENSING, AUTOMOTIVE M969 AND M969A1; SEMITRAILER, TANK: 5000 GALLON, FUEL DISPENSING, UNDER/OVERWING AIRCRAFT M970 AND M970A1
TECHNICAL MANUAL; OPERATOR’S, UNIT, DIRECT SUPPORT, AND GENERAL SUPPORT MAINTENANCE MANUAL
OCTOBER 1990
TM-9-2330-356-14 - Page 444 of 528
TM 9-2330-356-14
c.
Cleaning, Inspection, and Repair.
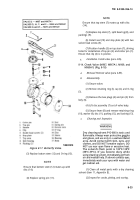
WARNING
Dry cleaning solvent P-D-680 is toxic and
flammable. Always wear protective goggles
and gloves, and use only in a well-ventilated
area. Avoid contact with skin, eyes, and
clothes, and DO NOT breathe vapors. DO
NOT use near open flame or excessive heat.
The solvent’s flash point is 100°F-138°F
(38°C-59°C). if you become dizzy while
using cleaning solvent, immediately get fresh
air and medical help. If solvent contacts eyes,
immediately wash your eyes with water and
get medical aid.
(1) Clean all metal parts with dry cleaning
solvent (item 11, Appendix E) and dry thoroughly.
(2) Inspect gears for worn, damaged, or missing
teeth. Replace gears if damaged.
d.
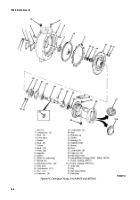
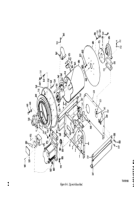
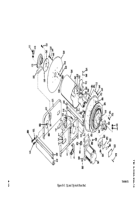
Assembly (Fig. 8-8).
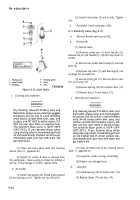
(1)
Assembly of Frame.
(a)
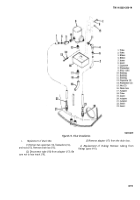
Position one side angle (72) onto the two
frames (6 and 15). Secure in place with four capscrews
(71), lockwashers (68), and nuts (69).
(b)
Install other side angle (72) onto the two
frames (6 and 15). Secure in place with four capscrews
(71), lockwashers (68), and nuts (69).
(c)
Install both tie rods (70) onto the frames
(6 and 15). Secure with four capscrews (66), washers (67),
lockwashers (68), and nuts (69).
(2) Installation of Terminal Board in Motor
Junction Box.
(a)
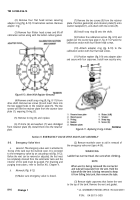
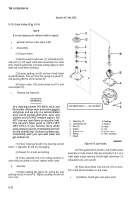
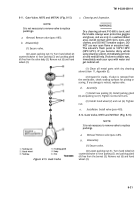
Install the two nuts (2, fig. 8-7) on studs
(1) on the terminal board (3). Install the middle capscrew
(4) and one nut (5) onto the terminal board.
(b)
Position the terminal board in the motor
junction box (6). Install screw (7), but do not tighten.
Install capacitors (8 and 9) onto screw (7). Be sure
capacitors are installed with marking in position shown in
figure 8-7. Tighten screw (7).
(c)
Install lead with terminal (11, fig. 8-7)
from motor along with capacitor lead to terminal board.
Secure with screw (10). Install motor lead and capacitor
lead to screw (4). Install second nut (5) and tighten.
(d)
Reconnect hose reel wiring in motor
junction box (para 4-27).
(e)
Replace motor junction box cover (53,
fig. 8-8) and secure in place with four machine screws (52).
(3)
Installation of Motor (Fig. 8-8).
NOTE
Be sure pinion gear teeth mesh properly with
the ring gear teeth.
(a)
Install pinion gear (62) on motor shaft.
Tighten set screw (61).
(b)
Position motor between mounting
bracket (60, fig. 8-8) and frame (6). Install four capscrews
(57), lockwashers (58), and nuts (59).
(c)
Install bushing (56) into junction box
(55). Install assembly onto motor.
(d)
Connect the two motor leads to the
terminal board (63) in the junction box. Connect leads to
terminal board and install conduit (para 4-27). Replace
cover (53) and secure with four machine screws (52).
(4)
Drum Assembly.
(a)
Attach bevel gear (51, fig. 8-8) to disc
(47) with six screws (49) and shakeproof washers (50).
Attach ring gear (46) to disc (47). Use six spacers (48)
between the ring gear and disc, and secure with six screws
(44) and lockwashers (45).
(b)
Position the support collar (40) on disc
(47), and secure with six capscrews (41), lockwashers (43),
and nuts (42).
(c)
Install swing joint (30) through support
collar (40) and tighten set screw (39).
(d)
Install a new O-ring (38) between
adapter elbow (29) and outlet elbow (37). Secure the
outlet elbow to the adapter elbow with four capscrews (35)
and lockwashers (36).
(e)
Screw adapter elbow (29) onto swing
joint (30).
(f)
Install axle shaft (34) to adapter elbow
(29) with capscrew (31), lockwasher (32), and nut (33).
(g)
Install four spacers (28) onto disc (47)
using four studs, lockwashers (76), and nuts (75).
(h)
Install drum (26) over the four spacers
(28), lockwashers (76), and nuts (75).
8-14
Back to Top

