TM-9-2350-256-10 - Page 663 of 796
REMOVAL - Continued
WARNING
•
Track must be chocked (WP 0103) so that vehicle will not roll out of control during
track maintenance. Failure to securely block vehicle tracks may result in personnel
death, injury, and/or damage to equipment.
•
Ensure proper eye protection is worn when hitting metal parts. Metal can break off
and act as a projectile when hit. Failure to comply may result in personnel injury.
5.
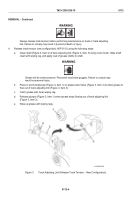
Loosen wedge bolt (Figure 4, Item 1) securing end connector (Figure 4, Item 4) to track shoe assembly pins
(Figure 4, Item 7). Hit wedge bolt with a hammer to loosen metal wedge (Figure 4, Item 5).
6.
Remove wedge bolt (Figure 4, Item 1) and metal wedge (Figure 4, Item 5) from end connector
(Figure 4, Item 4). Discard wedge bolt and metal wedge.
7.
Hit end connector (Figure 4, Item 4) with a hammer to loosen end connector on track shoe assembly pins
(Figure 4, Item 7).
8.
Position hooks on track end connector puller and pump (Figure 4, Item 6) behind end connector
(Figure 4, Item 4); then align studs on track end connector puller and pump (Figure 4, Item 6) with pins on
track shoe assembly (Figure 4, Item 7).
9.
Pump handle on track end connector puller and pump (Figure 4, Item 6) until the space between end
connector (Figure 4, Item 4) and track shoe assembly (Figure 4, Item 2) is 1 in. (25 mm).
10.
Repeat Steps 5 through 9 for three remaining end connectors of track shoe being replaced.
11.
Install track connecting fixtures (Figure 4, Item 3) behind end connectors (Figure 4, Item 4).
Figure 4.
Track Shoe Assembly Connectors.
TM 9-2350-256-10
0112
0112-5
Back to Top


