TM-9-2350-311-20-2 - Page 268 of 828
TM 9–2350–311–20–2
5–12
Change 2
5–6
ADJUSTER LEAF SPRING — CONTINUED
a.
Removal — Continued
4
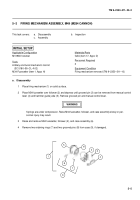
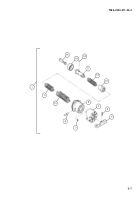
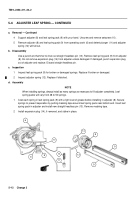
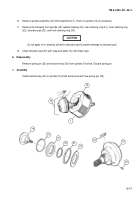
Support adjuster (8) and leaf spring pack (9) with your hand. Unscrew and remove setscrew (10).
5
Remove adjuster (8) and leaf spring pack (9) from operating crank (6) and detent plunger (11) and adjuster
spring (12) will fall out.
b.
Disassembly
Use a punch and hammer to drive out straight headless pin (13). Remove leaf spring pack (9) from adjuster
(8). Do not remove expansion plug (14) from adjuster unless damaged. If damaged, punch expansion plug
out of adjuster and replace. Discard straight headless pin.
c.
Inspection
1
Inspect leaf spring pack (9) for broken or damaged springs. Replace if broken or damaged.
2
Inspect adjuster spring (12). Replace if distorted.
d.
Assembly
NOTE
When installing springs, always install as many springs as necessary to fill adjuster completely. Leaf
spring packs will vary from 48 to 50 springs.
1
Coat each spring in leaf spring pack (9) with a light coat of grease before installing in adjuster (8). Secure
springs to prevent separation by putting masking tape around leaf spring pack near bottom end. Insert leaf
spring pack in adjuster and install new straight headless pin (13). Remove masking tape.
2
Install expansion plug (14), if removed, and stake in place.
14
8
9
9
13
12
11
8
10
9
6
Back to Top

