TM-9-2350-311-34-2 - Page 270 of 552
TM 9-2350-311-34-2
6-1
POWER PACK ASSEMBLY-CONTINUED
c. Inspection and Repair
1
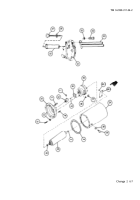
inspect fluid level gage (27). Replace if bent or distorted.
2
Inspect fluid filter element (22). Replace if cut or torn.
3
Inspect tube assembly (23). Replace if damaged.
4
Inspect power pack reservoir (24). Replace if cracked or if end surfaces are rough or distorted.
5
Inspect upper shaft coupling half (42), flexible insert (17), and lower shaft coupling half (19). Replace parts
that are cracked, distorted, or worn.
6
Inspect mount assembly (33). Replace if cracked, distorted, or damaged.
7
Inspect rotary pump (39). Replace if defective.
8
Inspect two plain studs (47). Replace if bent, distorted, cracked, or damaged.
d. Assembly
All parts and inside surfaces must be free of contaminants during assembly.
1
If removed, install new spring pin (48) and two plain studs (47). Torque plain studs to 21-25 lb-ft (28-34
N•m).
1.1
If removed, secure identification plate (48.2) onto power pack reservoir (24) using four drive screws (48.1).
2
Install new preformed packing (46) on filter assembly/body assembly (45).
3
Install rotary pump (39) on filter assembly/body assembly (45).
4
Install new preformed packing (44) on filter assembly/body assembly (45).
5
Install setscrew (41) in upper shaft coupling half (42). Install machine key (43) and upper shaft coupling half
on rotary pump (39) shaft.
6
Install new preformed packing (40) on rotary pump (39).
7
Before installing, flush new filter assembly (45) with hydraulic fluid.
8
Install rotary pump (39) onto mount assembly (33) with two new lo&washers (38) and two hex nuts (37).
Torque hex nuts to 20-25 lb-ft (27-34 N•m).
6-8 Change 2
Back to Top


