TM-9-2520-270-34 - Page 701 of 933
TM 9-2520-270-34
Do not
Damage
CAUTION
allow hose assemblies to touch.
to equipment can occur.
Hose assemblies must be positioned without
kinks or unnecessary bends. Damage to
equipment can occur.
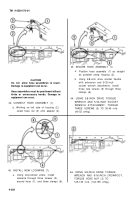
42. CONNECT HOSE ASSEMBLY (1).
a. Working on left side of housing (2),
screw hose nut (3) onto adapter (4).
45. INSTALL NEW LOCKWIRE (7).
a.
4-368
Using wire-twister pliers, install
Iockwire through three screws (5),
around hose (1), and three clamps (6).
43. SECURE HOSE ASSEMBLY (1).
a.
b.
Position hose assembly (1) as straight
as possible along housing (2).
Using 3/8-inch drive ratchet handle
with extension and 5/32-inch
socket wrench attachment, install
three new screws (5) through three
clamps (6).
44. USING 3/8-lNCH DRIVE TORQUE
WRENCH AND 5/32-lNCH SOCKET
WRENCH ATTACHMENT, TORQUE
THREE SCREWS (5) TO 35-45 in-lb
(40-52 cmkg).
46. USING 3/8-lNCH DRIVE TORQUE
WRENCH AND 9/16-lNCH CROWFOOT,
TORQUE HOSE NUT (3) TO
125-135 in-lb (144-155 cmkg).
Back to Top


