TM-9-2815-200-35
ENGINE, WITH CONTAINER:TURBOSUPERCHARGED, DIESEL ,FUEL INJECTION ,90-DEGREE “V” TYPE, AIR - COOLED ,12 - CYLINDER , ASSEMBLY ;MODELS AVDS-1790-2M (2815-856-4996), AVDS-1790-2A AND AVDS-1790-2AM (2815-856-9005)
TECHNICAL MANUAL; DIRECT SUPPORT, GENERAL SUPPORT AND DEPOT MAINTENANCE MANUAL INCLUDING REPAIR PARTS AND SPECIAL TOOLS LISTS
TM-9-2815-200-35 - Page 312 of 779
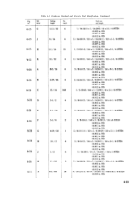
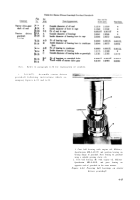
Table 6-2. Crankcase Assembly Overhaul Standards
Component
Crankcase
B-2
B-2
B-3
B-3
B-3
B-3
B-3
B-2
B-3
B-3
B-3
B-14
B-14
B-3
Ref.
letter
A
B
E
V
D
F
F
B
C-D
T
U
H
Q
T-G
Point of measurement
Inside diameter of bearing bore in crankcase
Outside width of main thrust bearing cap and
thrust bearing surface in crankcase
Thickness of main bearing half at center (refer
to B-3, D-C, below)
Thickness of main bearing half 1 / 2 inch from
ends (to be 0.0005 to 0.0010 less than at
center “E”)
Inside diameter of main bearing at proper
torque tightness (90 degrees to split line)
(STD)
0.003 undersize
0.010 undersize
Inside width of main thrust bearing face
Fit of main thrust bearing over bearing cap and
thrust bearing surface in crankcase
Fit (oil clearance) of bearings on journals (refer
to table 6-9)
Outside width of main thrust bearing
Thickness of main thrust bearing flange (refer
to B-3, D-C, above)
Inside diameter of bearing bore in crankcase
liner (starter)
Inside diameter of bearing bore in crankcase
liner (generator)
Fit (crankshaft end play) of thrust bearing in
journal (refer to table 6-9)
Sizes and fits
of new parts
4.7538 4.755 3
2.0240
2.0260
0.2492
0.2499
4.2545
4.2575
4.2515
4.2545
4.2445
4.2475
2.0300
2.0320
0.0040L 0.0080L
0.0040L 0.0080L
2.4860
2.4880
0.2270
0.2290
2.8346
2.8353
2.8346
2.8353
0.0110
0.0150L
Wear limits
* *
* *
4.2585
4.2555
4.2485
*
*
0.0100L
2.4840
2.8356
2.8356
0.0190L
Note.
Refer to paragraph 6-3b for explanation of symbols .
6-18
Back to Top


