TM-9-2815-205-24 - Page 701 of 856
DISASSEMBLY - Continued
CAUTION
Use care not to damage piston pin while removing vacuum gage testers.
8.
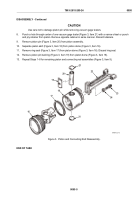
Punch a hole through center of one vacuum gage tester (Figure 3, Item 21) with a narrow chisel or punch
and pry retainer from piston. Remove opposite retainer in same manner. Discard retainers.
9.
Remove piston pin (Figure 3, Item 20) from piston assembly.
10.
Separate piston skirt (Figure 3, Item 18) from piston dome (Figure 3, Item 16).
11.
Remove ring seal (Figure 3, Item 17) from piston dome (Figure 3, Item 16). Discard ring seal.
12.
Remove piston pin bushing (Figure 3, Item 19) from piston dome (Figure 3, Item 16).
13.
Repeat Steps 1–8 for remaining piston and connecting rod assemblies (Figure 3, Item 9).
16
17
18
19
21
21
20
22
23
24
MAINT_373
Figure 3.
Piston and Connecting Rod Disassembly.
END OF TASK
TM 9-2815-205-24
0095
0095-5
Back to Top


