TM-9-2815-205-34 - Page 444 of 596
TM 9-2815-205-34
3-65. FUEL INJECTOR ASSEMBLY
This task covers: a. Disassembly
d. Lapping
REPAIR
b. Cleaning
c. Inspection/Measurements
e. Assembly
f. Testing
INITIAL SETUP
MODELS
All
TOOLS AND SPECIAL TOOLS
Tool kit, general mechanics (App B, Item 107 )
Wrench, torque (App B, Item 116 )
Fixture, injector holding (App B, Item 28 )
Tool kit, diesel injector (App B, Item 106 )
Wrench, injector
Driver, spray tip
Brush, injector
Vise, pin
Wire, spray tip (0.006 in.)
Brush, rack hole
Reamer, nut tip
Reamer, nut tip – tip hole
Remover, carbon
Reamer, injector body (App B, Item 83 )
Tester, spring (App B, Item 103 )
Gage, needle valve height (App B, Item 44 )
Block set, lapping (App B, Item 9 )
Gage, injector tip& concentricity (App B, Item
Brush, wire, brass (App B, Item 11 )
TOOLS AND SPECIAL TOOLS (Cont)
Tester, diesel fuel (App B, Item 101 )
Tester, diesel fuel injector nozzle (App B, Item
102 )
Micrometer set (App B, Item 73 )
Micrometer (1-2 in.
Micrometer (0-1 in.
MATERIALS/PARTS
Packing, preformed (App F, Item 117)
Spacer, ring (App F, Item 180)
Filter element (App F, Item 25)
EXPENDABLE/DURABLE SUPPLIES
Oil, fuel (App C, Item 27)
Cleaning solvent (App C, Item 9)
Oil, engine (App C, Item 26)
Lapping compound (App C, Item 22)
Wood block (App C, Item 58)
EQUIPMENT CONDITION
Para Description
3-64 Injectors removed
NOT E
Injectors which were removed from engine should be tested [reference steps f.(1) thru
f.(6)] prior to any disassembly to avoid unnecessary repair.
a. Disassambly
(1)
(2)
(3)
(4)
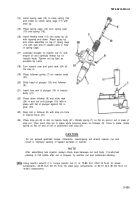
Using brass wire brush, remove carbon
from injector nut (1) and spray tip (2).
Place injector upright in injector holding
fixture (3).
Remove two fuel line connectors (4), two
ring spacers (5), and filter element (6).
Discard filter and ring spacers.
Rotate follower spring (7) until end is
clear of stop pin (8). Press down on
follower (9) and compress spring. Then
raise spring above pin with screwdriver
and remove pin. Gradually release
pressure on follower and spring.
3-314
Back to Top


