TM-9-2320-273-34 - Page 491 of 801
TM 9-2320-273-34
(6)
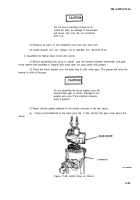
Holding the input yoke, push in the input bearing while turning the yoke side to side to
seat the bearing. Set the indicator to zero.
(7)
Next, pull the yoke outward, again turning it side to side and take note of reading on the
dial indicator.
(8)
Final end play must be between 0.003-0.007 inch (0.076-0.178 mm). If not, adjust by
either adding or removing shims from under the bearing cover and repeat above procedures.
NOTE
Add shims to increase end play;
remove shims to decrease end play.
(9) After correct end play has been established, torque the input yoke nut to 450-600 Ib-ft
(610-813 N•m).
p. Adjust Shift Shaft.
(7)
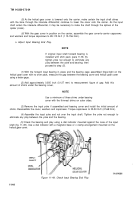
If the shift shaft adjusting screw and jam nut have not been assembled, install both parts
into the helical gear cover in back of the shift shaft. Turn in the adjusting screw approximately two turns
at this time.
(2)
Using a shop air supply, apply air pressure to the air chamber. This will move the shift
shaft, fork and collar back, locking the interaxle differential.
(3)
Make sure the collar travels over the splines and engages with the rear side gear. If
necessary, index the shift collar by turning the input shaft.
(4)
With the shift shaft moved back its full travel, turn in the adjusting screw until it just
touches the end of the shift shaft.
(5)
From this point continue turning in screw 1-1 1/4 turns more and lock adjusting screw with
jam nut; torque jam nut to 40-55 Ib-ft (54-75 N•m). This will allow correct clearance between the fork
and groove of the collar, thus eliminating wear.
{6)
After shift shaft adjustment has been made, remove the air line from the air chamber.
11-10. Differential Carrier Installation.
a. Clean and Inspect the Housing.
(1)
Remove any accumulation of dirt, grit, or gum from the housing bowl and sleeves. Clean
the housing thoroughly with SD-2 dry cleaning solvent (item 12, App B) and blow dry with compressed air.
(2)
Inspect the housing for cracks, nicks, and burrs on machined surfaces. Remove nicks and
burrs with a stone or file. Make all necessary repairs or parts replacements before installing the drive unit
in the housing. Be sure the housing is thoroughly cleaned after repairing.
b. Install the Differential Carrier.
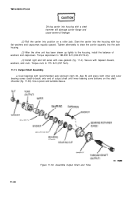
(1)
Apply silicone sealant (item
24,
App B) over the drive unit opening in the housing.
11-45
Back to Top

