TM-9-2320-273-34 - Page 496 of 801
TM 9-2320-273-34
11-14.
a.
b.
Differential Carrier Removal.
Remove the plug from bottom of the axle housing and drain the lubricant.
Do not hit the circular driving lugs on
the shaft head. This may cause the lugs
to shatter and splinter. Do not use chisels
or wedges to loosen the shaft or dowels.
This will damage the hub, shaft, and oiI
seaI.
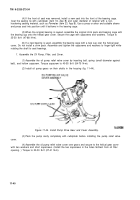
Remove the axle shaft stud nuts, washers and tapered dowels (fig. 11-4). To loosen the tapered
CAUTION
dowels, hold a 1‘%-inch diameter brass drift against the center of the axle shaft head, inside the circular
driving lugs. Strike the drift a short blow with a 5-8 lb hammer or sledge. A 1%-inch diameter brass
drift is excellent and safe.
c.
Remove the axle shaft from the drive unit and housing. (Refer to para 11-4 b.)
d.
To remove the carrier from the housing, first loosen the two top capscrews and leave them
attached to the housing. This will prevent the carrier from falling.
e.
Remove alI other capscrews, nuts, and washers. Break the carrier loose from the housing with a
rawhide mallet.
f.
Place a roller jack under the carrier. Remove the top capscrews and washers and work the carrier
free, A smaII pinch bar may be used to straighten the carrier in the housing bore. However, the end must
be rounded to prevent indenting the carrier flange. Discard the carrier-to-housing gasket if used. Remove
studs only if replacement is needed.
g. Place the carrier assembly in a suitable holding fixture.
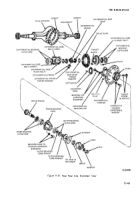
11-15. Differential Carrier Disassembly (fig. 11-51 ).
a. Remove Differential and Gear Assembly.
(1)
With the carrier still in an upright position, loosen jam nut and back off the drive gear
thrust screw.
(2)
Rotate the carrier 180° and bring the drive gear to an upright position.
(3)
Check and record the backlash. This information will be needed in reassembly unless a
new gear set is used,
(4) Center-punch one differential carrier leg and bearing cap to identify at reassembly.
(5)
Remove the carrier cap capscrews, washers, and cotter keys from both sides of the carrier.
(6)
Remove the bearing adjusting rings and the carrier caps.
(7)
Remove the thrust block from the inside of the carrier housing.
11-50
Back to Top

