TM-9-2330-342-23-P - Page 457 of 1348
FIELD MAINTENANCE
12 VOLT AND 24 VOLT TRAILER LIGHT CABLE REPAIR
INITIAL SETUP:
Tools and Special Tools
Tool Kit, General Mechanic's: Automotive
(WP
0194, Table 1, Item 47)
Tool Kit, Electrical Contact (WP
0194, Table 1,
Item 15)
Gun, Heat (WP
0194, Table 1, Item 19)
Materials/Parts
Heat Shrink, Sealed (WP
0193, Table 1, Item 38)
Tags, Identification (WP
0193, Table 1, Item 59)
Contact, Electrical Qty:
1 (WP
0195, Table 1, Item
37)
Materials/Parts (cont.)
Contact, Electrical Qty:
1 (WP
0195, Table 1, Item
38)
Lockwasher Qty:
6 (WP
0195, Table 1, Item 77)
References
Fig. 10 (WP
0145)
Equipment Condition
Wheels chocked (TM 9-2330-342-10). (WP
0190)
12 VOLT CABLE REPAIR
DISASSEMBLY
CAUTION
Terminals come in different styles and sizes. To prevent damage, ensure to use only the
exact replacement. Do not attempt to modify terminal to fit.
NOTE
Repeat procedure as necessary.
1.
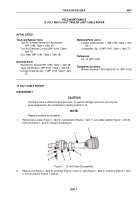
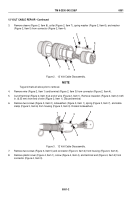
Remove two screws (Figure 1, Item 6), lockwashers (Figure 1, Item 7), and cable clamps (Figure 1, Item 8)
from nut (Figure 1, Item 5). Discard lockwashers.
1
2
3
4
5
6
7
8
Figure 1.
12 Volt Cable Disassembly.
2.
Remove nut (Figure 1, Item 5), grommet (Figure 1, Item 4), seal (Figure 1, Item 3), and boot (Figure 1, Item
1) from connector (Figure 1, Item 2).
TM 9-2330-342-23&P
0051
0051-1
Back to Top

