TM-9-2330-342-23-P - Page 463 of 1348
24 VOLT CABLE REPAIR - Continued
WARNING
Never use open flame to apply heat to heatshrink tubing. Failure to comply may result in injury
or death to personnel.
4.
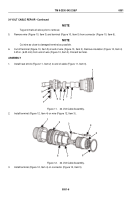
Using a heat gun, apply heat to heat shrink (Figure 11, Item 2).
5.
Install gasket (Figure 12, Item 6), spring washer (Figure 12, Item 8), washer (Figure 12, Item 7), collar (Figure
12, Item 2), and sleeve (Figure 12, Item 1) on connector (Figure 12, Item 5).
6.
Install seal (Figure 11, Item 4), grommet (Figure 11, Item 5), and nut (Figure 11, Item 6) on connector (Figure
11, Item 1).
7.
Install two cable clamps (Figure 11, Item 9) on nut (Figure 11, Item 6) with two lockwashers (Figure 11, Item
8) and screws (Figure 11, Item 7).
END OF TASK
FOLLOW-ON MAINTENANCE
Remove wheel chocks (TM 9-2330-342-10). (WP
0190)
END OF TASK
END OF WORK PACKAGE
TM 9-2330-342-23&P
0051
0051-7/8 blank
Back to Top

