TM-9-2350-311-34-2 - Page 250 of 552
TM 9-2350-311-34-2
5-13 BUFFER ASSEMBLY-CONTINUED
e. Installation
1
2
3
4
5
6
7
8
9
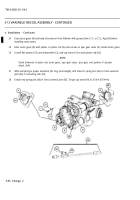
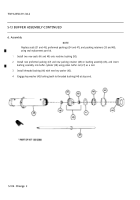
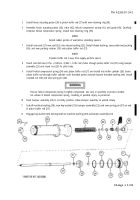
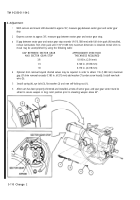
Install new preformed packing (14), hex nut (13), and front tube (12) onto front of buffer assembly (7).
Install new preformed packing (18), new packing retainer (17), hex nut (16), and tube elbow (15) onto top,
rear of buffer assembly (7).
Install new preformed packing (22), new packing retainer (21), hex nut (20), and tube elbow (19) onto bot-
tom, rear of buffer assembly (7).
Insert buffer assembly (7) into cradle assembly (11).
Install four flat washers (10) and four cap screws (9) into buffer assembly (7) flange. Torque cap screws to
38 lb-ft (52 N•m).
Connect three hydraulic lines at front line nut (8), and bottom nut (6) and top nut (5) on buffer assembly (7).
Return cannon assembly into battery.
While holding shaft collar (2) with pipe wrench, install rear slotted nut (3) on shouldered shaft (4). Shoul-
dered nut should be tightened until slotted nut and shaft collar are just beginning to touch breech ring body
(51). Loosen slotted nut 1/6 to 1/3 turn while alining cotter pin (1) hole in shouldered shaft with slots in
slotted nut.
Install new cotter pin (1).
5-106 Change 2
Back to Top

